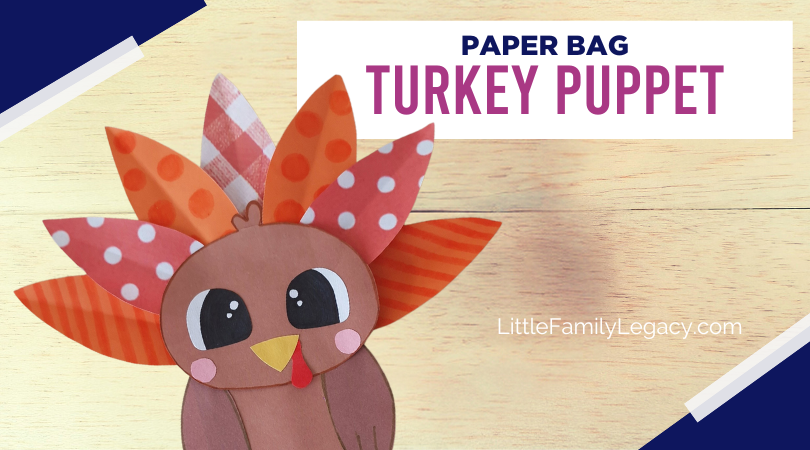
Hey there, craft lovers! As the leaves start to change and the air gets crisp, our family dove into a seasonal favorite: the turkey puppet craft, also known as the paper bag turkey. This craft is perfect for bringing a little holiday cheer and a lot of giggles to your home. It’s a fantastic project for kids of all ages, and trust me, we had a blast creating our flock of feathered friends. Of course, we encountered a few challenges and even some Pinterest mom fails along the way, but that’s all part of the fun. Let’s get into the nitty-gritty of our turkey puppet adventure!
List of Supplies:
- Colored craft papers
- Patterned craft papers
- Paper bag
- Pencil
- A pair of scissors
- Craft glue
- Sharpies
Instructions:
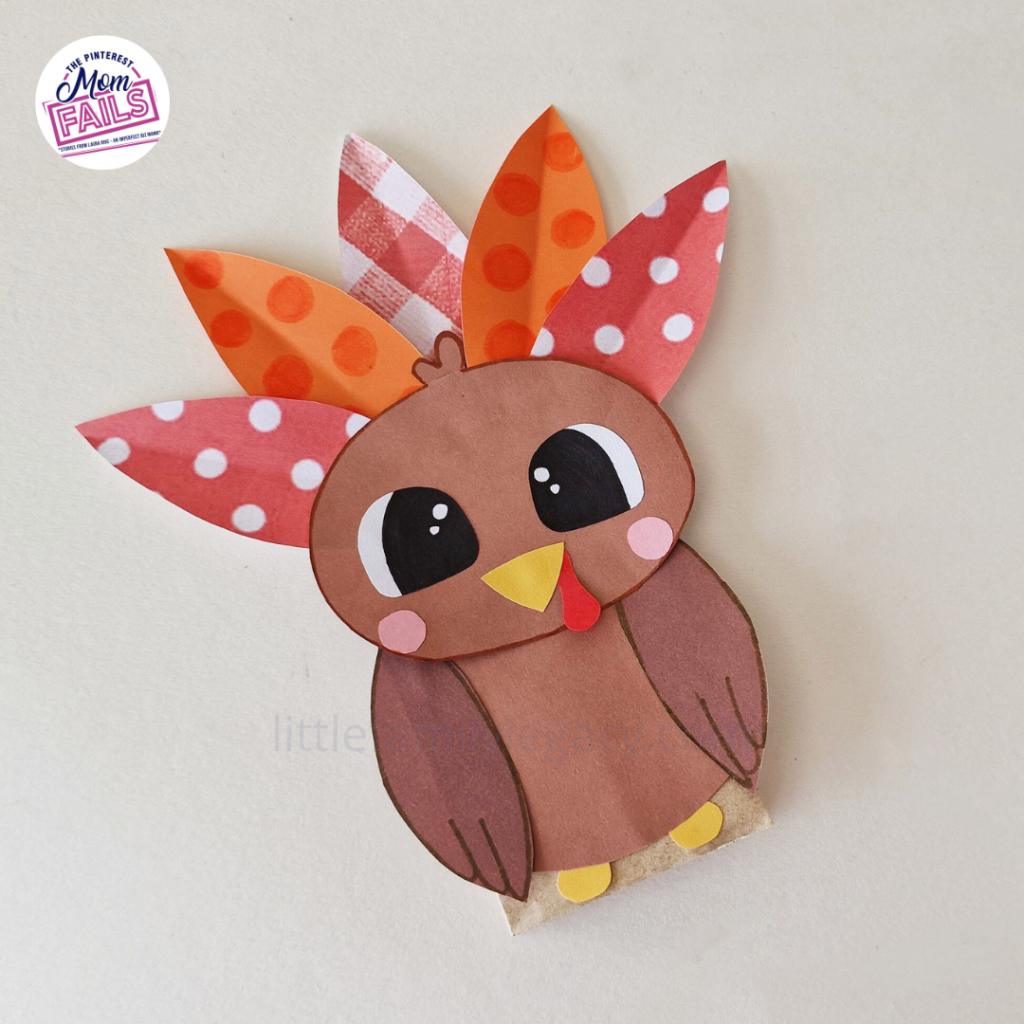
- Step 1: Select colored craft papers and prepare the template patterns. Trace the head, hair, wing, and lower body pattern on any shade of brown-colored craft paper. Trace and cut out the tail feathers from colorful and patterned craft papers. Prepare the other patterns (beak, wattle, blush, eye bases, and legs) too.
- Step 2: Attach the wattle cutout on the backside of the beak cutout and attach the hair cutout on the top side of the head cutout

- Step 3: Use sharpie to draw eyes on the eye base cutouts. Attach the eye cutouts on the head, along the top part. Attach the blush cutouts on the cheek parts.
- Step 4: Attach the beak-wattle pattern on the head, below the eyes.
- Step 5: Prepare a piece of paper for the lower body (in case the provided pattern does not cover the paper bag you’re using). Attach the leg cutout on the bottom side of the lower body cutout. Use sharpie to add textures to the wing cutouts.

- Step 6: Attach the wing cutouts on both sides of the lower body pattern.
- Step 7: Take the tail feather cutouts and fold them in half, lengthwise to leave crease lines.
- Step 8: Join the tail feather cutouts together on any one side and form a blooming pattern.
- Step 9: Attach the tail feather pattern on the backside of the head pattern.
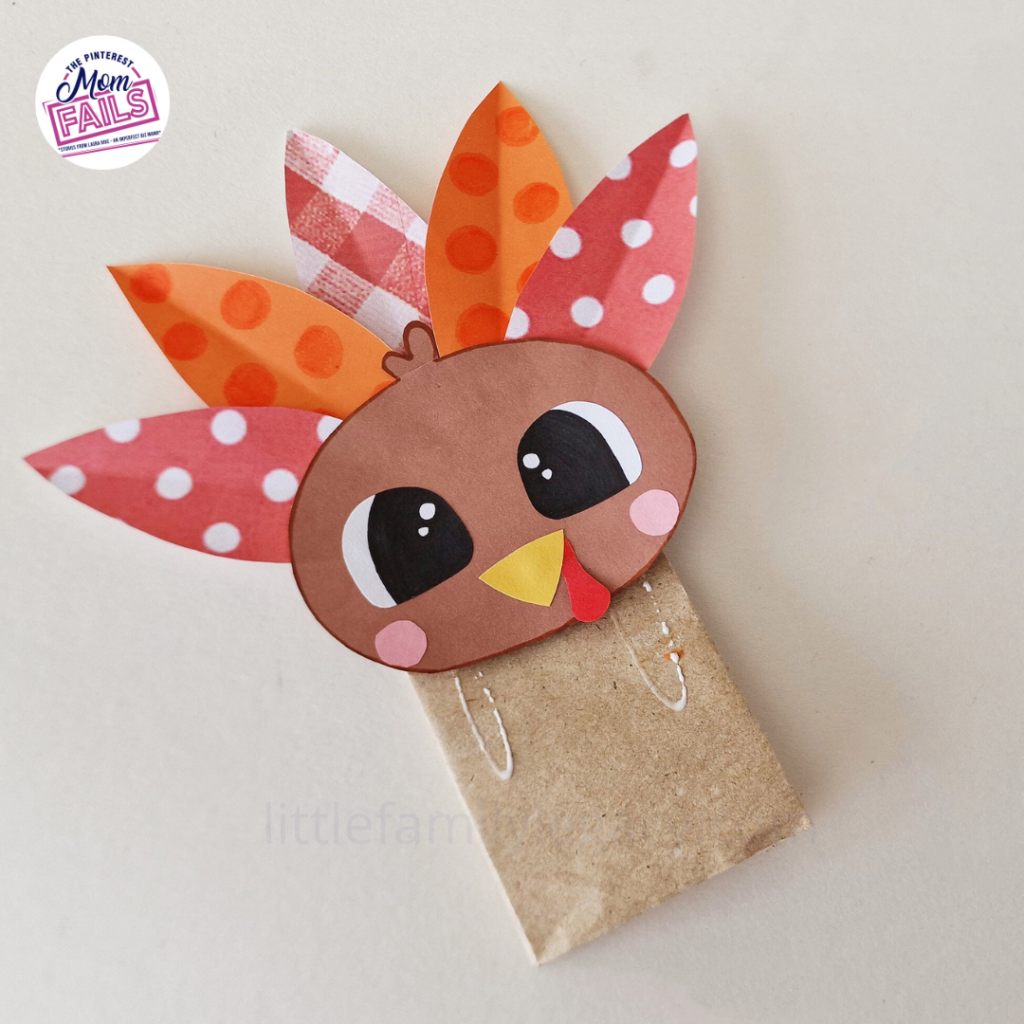
- Step 10: Prepare the paper bag. Flatten its bottom part with any one side of the bag.
- Step 11: Attach the head pattern on the flattened bottom part.
- Step 12: Attach the lower body pattern on the paper bag (the side below the head).
The Fun (and Challenges)
We kicked off our crafting session with a burst of excitement. The kids were thrilled to turn plain paper bags into adorable turkeys. The table was covered with colorful construction paper, googly eyes, feathers, and other decorations. As soon as we laid out the supplies, their imaginations took flight.
One of the most fun aspects of this craft was watching the kids’ personalities shine through their turkeys. Our oldest decided her turkey needed glasses and a bow tie, while our youngest went for a rainbow-colored tail. The creativity was off the charts, and it was heartwarming to see how proud they were of their unique creations.
However, we did face a few challenges. For one, getting the googly eyes to stick to the paper bags was trickier than expected. We tried glue sticks, but the eyes kept sliding off, which led to a lot of giggles and a bit of frustration. Eventually, we switched to glue dots, which worked like a charm.
Another hurdle was managing the feathers. Those fluffy little things have a mind of their own! They ended up all over the place – on the floor, in our hair, even on the dog. It took a bit of patience (and a lot of vacuuming) to keep things under control. But the joy on the kids’ faces as they picked out their favorite feathers made it all worthwhile.
Tips to Make This Craft Come to Life
- Prepare Your Space: This craft can get messy, especially with all the feathers and glue involved. Cover your table with an old tablecloth or some newspaper to make cleanup easier. And keep a vacuum or broom handy for those inevitable feather explosions.
- Use Strong Adhesive: We learned the hard way that not all glue is created equal. Glue dots or a hot glue gun (with adult supervision) are your best bet for making sure the googly eyes and other decorations stay put.
- Encourage Creativity: There’s no right or wrong way to make a turkey puppet. Encourage your kids to let their imaginations run wild. Whether their turkey has a top hat, rainbow feathers, or extra googly eyes, the most important thing is that they have fun.
- Be Patient: This craft requires a bit of fine motor skill, especially when it comes to cutting out shapes and gluing small pieces. Be prepared to lend a helping hand and remind your kids that it’s okay if things don’t turn out perfectly.
- Make It a Family Affair: This project is a great way to spend quality time together. Get everyone involved, from toddlers to grandparents. Each person can make their own turkey, and you’ll end up with a delightful and diverse turkey family.
Benefits for Each Age Group
- Toddlers: This craft is an excellent way for toddlers to develop their fine motor skills. They’ll enjoy gluing feathers and sticking on googly eyes, and the sensory experience of handling different materials is beneficial for their development. Just be sure to supervise closely to ensure they don’t put small pieces in their mouths.
- Preschoolers: Preschoolers will love the chance to use their imaginations and create something unique. This craft helps them practice following instructions and improves their hand-eye coordination. Plus, it’s a fun way to introduce them to holiday traditions and themes.
- School-Age Kids: Older kids can take their creativity to the next level by adding more intricate details to their turkeys. This craft also provides a great opportunity for them to practice cutting, gluing, and designing. It’s a wonderful way for them to express themselves and create something they can be proud of.
Pinterest Mom Fails
No crafting session is complete without a few Pinterest mom fails, and this one was no exception. Our first major hiccup was when we tried to attach the feathers. The kids were so enthusiastic that they ended up with glue everywhere – on their hands, the table, and even their clothes. We quickly learned that less is more when it comes to glue!
Another funny mishap was our attempt to make 3D beaks. We thought it would be cute to fold a piece of paper into a triangle and glue it to the bag. Well, those beaks did not want to stay put. They kept falling off, leaving our turkeys looking a bit beakless. After a few attempts, we decided to draw the beaks on instead. It wasn’t what we planned, but the kids thought it was hilarious and rolled with it.
And then there was the moment when our toddler decided the googly eyes would make great buttons for her shirt. She walked around with eyes stuck to her clothes, proudly showing off her new “buttons.” It was adorable and added a whole new level of fun to our crafting session.
Making Memories
Despite the glue mishaps and feather explosions, our turkey puppet craft was a huge success. The kids were so proud of their creations, and we all had a great time laughing and crafting together. It’s these moments of creativity and connection that make crafting so special.
Crafting isn’t just about the final product; it’s about the journey. It’s about the laughter, the problem-solving, and the memories we create along the way. Each turkey puppet was a labor of love, filled with the unique touches and personalities of its maker.
So, gather your family, lay out those supplies, and dive into the world of turkey puppet crafting. Embrace the challenges, celebrate the creativity, and most importantly, enjoy the time spent together. Happy crafting, friends! Gobble gobble!